Monday, February 22, 2010

Fixing a Hole

Warning: this post is not for the faint of heart!

Two things before you start:
1) This post contains a mystery which remains unsolved.
2) It has a happy ending.

So, I mentioned in another post that there was a hole.

This is it.


Yeah, it's not pleasant. Of course, when you look at it in context, it becomes a little less scary.Can you see it? I circled it below.


So, not a tiny hole and certainly not one that could be ignored. But it could have been worse. The weird thing about this hole, which I noticed almost immediate, was that there were no broken threads. I couldn't find the spot where the yarn had broken to allow this bit of unraveling to occur. For those of you who are not knitters, each knitted stitch is looped through the one below it. And is connected to the stitches on either side of it. If you drop a stitch at the top of a knitted piece, it's possible for that loop to unravel all the way down to the bottom cast on edge (similar to when you get a run in your pantyhose - starts as a little hole/broken thread and away it runs). But if you don't drop a stitch, and the yarn doesn't break, there's really no way for the loops to unravel. Even if this made no sense to you, trust me, there's no way for a hole to develop without a broken bit of yarn or a dropped stitch.

If some more experienced knitter out there does know how this could happen, please tell me. Because I cannot wrap my head around it. As you may have guessed, this is the mystery of the post.

I looked for the broken yarn, but couldn't find it and figured I would go about fixing the hole and the broken ends would present themselves. Fortunately for my current purposes, the lace is now very stiff, so the stitches were very easy to pick up. The hole occurred in the part that was knitted on size 10 needles, but I used a much smaller needle, a size 2 to pick up the stitches.

Here are the stitches picked up. You can see that I used a pair of needle nosed tweezers to pick up some of the loops. It worked so well that I can't believe I'd never though to use tweezers before. Even better than using a crochet hook!


You can see how the lifeline is right below the area where the hole formed. Sheesh! But back to the problem at hand. I figured out which part of the pattern had unraveled. Then separated the strands and started reknitting them. After knitting them on the size 2 needles, I transferred them over to a size 10 needle so that the stitch size was consistent. Here's the size 10 needle.
Here are both the size 10 and size 2 needles.
I kept knitting. I found no loose or broken threads. I completed the pattern and ended up just having to tie the bit I'd reknitted onto the existing stitches on the side. I used some of the left over yarn I'd dyed and tied it very tightly and wove in the ends.

If you look at the pic below you can see that although the worst of the hole has been corrected, there is a wide section right in the middle of that looks like a stocking run. There should be a line of stitches and yarn overs up through there. Somehow they'd vanished too.


I reknitted those stitches as well and then tied them in where they were supposed to be. Again my tweezers were quite helpful.
And that's how I fixed the hole in the dress. It looks pretty good if I do say so myself.

I still have no idea how the hole was created. I hope no other holes spontaneously appear. This was almost fun to fix, like doing a jigsaw puzzle and a logic problem at the same time. But it also took about two hours, during which time I was in the guest room with the door shut and Nyssa constantly beating on the door. (For those who don't know, she is a very large cat.) I would prefer not to do this again.

Friday, February 19, 2010

PS

Oh, remember the sleeve that went down the drain? And how it was draining normally?

Well Tuesday morning when I was taking my shower for work, I noticed that the tub was filling with water. Our drain is a little slow sometimes, so I didn't think too much of it until it was up to my ankles.

Some might call this denial.

By the time I recognized the problem, I had to seriously speed up my shower to keep water from overflowing onto the bathroom floor.

Fortunately some strenuous plunging dealt with the problem.

It's been fine since then.

I still haven't mentioned the whole sleeve/drain thing to Justin.

We'll see if he's reading the blog.

Thursday, February 18, 2010

Dyeing Saga continues

So I patiently waited my two days, which was really only one free evening of crafting time. I did some sewing and started knitting on my wedding shawl.

(Oh, did I not mention I'd decided to do a shawl too? My mom convinced me that it could be quite cold on May 15th, as it was in 2009 and I'd want to be able to go outside and still look pretty. So I started working on this in cream. In my defense, I conceived of this idea before I realized that there were going to be dyeing complications.)

Wednesday when I got home from work there was no change in the wrongness of the fabric color. Here it is with one of the swatches and a tiny ball of yarn dyed in the correct color. You can see at the top left of the picture that I'd dyed tons of extra yarn as well.

My plan was this - take some of the extra yarn and dye it in the yellow Rit dye. Take the sleeve which had gone through the dye remover (I never took a pic of that, but it came out baby blue) and dye it in the same green dye combo which had produced the swatches above. Of course it also produced the dress, so that was a bit risky. I also did some more reading and figured that at some point I'd upped the amount of dye I was using more than necessary, so I decreased that as well.

I mixed up the big vat of Rit dye, using a cup of salt as they'd recommended when dyeing linen. (I'd also bought more salt.) And I did a little sample size of the green dye. (not pictured)

Well after about 15 minutes I thought that the sample in the yellow looked great. I waited 30 minutes as instructed. Still good. I rinsed. Still good. I washed in Synthrapol - still good!

At this point the green sleeve had been in soda ash for about 15 minutes but I could tell that it looked waaaay too dark. I decided to throw caution to the winds and dye the whole dress (except for the two sleeves, since one was down the drain and one was in the other dye bucket).

So I did. Part way through I was concerned that the yellow was being too highly diluted - there was now a LOT more fabric in the bucket and it was still leaking green dye, despite being washed and rinsed several times. I diluted some dye in hot water and poured it in.

After half an hour I pulled it out. It looked great. I rinsed, washed in Synthrapol and then spent what felt like the next 3 hours washing out all the Synthrapol. I think that was my initial mistake. I didn't get out all the Synthrapol and it prevented the dye from taking properly in the first vat.

So I rinsed and rinsed and rinsed and soaked over night.

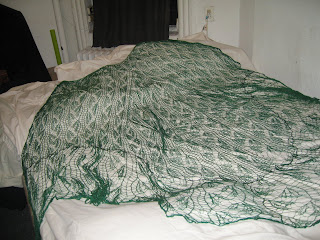
When I left for work on Thursday I left this behind me.

That's our guest room bed underneath - it's a queen sized bed. So that gives you an idea of the scope of this thing.

There are still some problems. There's a big hole in the train right above the switch from the Size 13 to the Size 10 needles. If it had been in the Size 13 part I'd have just cut the whole thing out as now that it's been fully wetted down the whole thing is about 4-6" too long. (So much for hearing that dye was going to shrink it!) But anyway, the hole is above the lifeline. After all that we've been through though, this doesn't even phase me. The size of the hole compared to the overall size of the dress is so tiny. It's kind of hard to imagine b/c it is a big whole. But I think I could gather it shut with dental floss and it would barely be noticeable in that sea of knitting. (I won't be doing that obviously).

Thursday morning Justin and I stood cramped in the guest room with Justin blocking the door so the cat couldn't enter. Nyssa feels that the guest room is her room and was quite displeased with me for kicking her out. We looked at the dress and I sighed deeply. Justin gave me a hug. Then he screamed. I looked at him.

"The cat scratched me trying to get in, " he said, "let's get the hell out of here before she does something drastic."

So we shut the door and went to work.

Tuesday, February 16, 2010

Dyeing is Done

And wow was it a bitch. I actually had off President's Day this year for the first time ever. Following the sage advice of my mother, that it was time to shoot the designer and dye the fabric.

So I set out to exacting replicate my earlier results in terms of color.

First I soaked the dress in Synthrapol to remove any dirt or anything that would interfere with the dyeing process.
Then I measured out the salt - salt helps the dye bond onto the fibers. It took all the salt I had in the house, almost precisely!

I carefully mixed up the dye and mixed it altogether. I remembered to add Calsolene oil to break the surface tension of the dye (not doing this had led to problems in the past).And dropped in the dress! I was dyeing the skirt portion of the dress as well as two little sleeves I'd knitted. After much trial and error I'd finally come up with sleeves that worked properly. Earlier efforts which I'd blogged about turned out not quite right - the left sleeve looked a little wonky b/c of the way the pattern decreased. I ended up having to reverse the pattern for the right sleeve, knitting where I would have purled and purling where I would have knit. It was a pain in the butt, but it looked good in the end.

I made kind of a mess.

I waited and stirred.

Justin woke up and politely requested use of our bathroom.

I moved the whole she-bang into the living room so I could babysit it while Justin got ready for work.

After 20 minutes I stirred in the soda ash to set the dye. Then I let it sit for 45 more minutes.

And in then I rinsed it out.
It was a color that was about as wrong as wrong could possibly be. Not a bad color, but certainly not the color I want my wedding dress to be and not a color remotely similar to ANY of the tests I'd done previously. I did a wash in Synthrapol. No help.

I sat down and had a beer. It was 2:45pm. I waited 15 minutes and then called Justin at work and told him what had happened. He told me that he knew I would figure it out. I took some deep breaths and researched dye removal on the internet. I found out that although dyers hate and scorn Rit dye, Rit Color Remover is considered quite good. I put the whole dressin a barrel of Synthrapol with really hot water and went out to Michael's.

I'd planned to go to Michael's to look at beads for a possibly headpiece, but found that I could not focus (funny that). I ended up going to their tie dye section and buying two boxes of color remover and a bottle of yellow dye. After all, the dress was blue and as every school child knows, yellow + blue = green.

I went home, dumped out the dress and proceeded to rinse it out. As I was doing this, one of the sleeves slipped free from the mass of knitting and went down the drain of our bathtub. It is indicative of the mental state I was in that this really didn't even phase me. I tried to grab it, failed and then kept rinsing. Our drain has no stopper and is basically a pipe that takes a sharp 90 degree turn about 2" down, so it was just gone. The water seemed to be draining okay, so I just kept rinsing.

I mixed up one packet of dye remover and dropped in the remaining sleeve. It immediately turned a lighter blue. I said a bad word and then left it to soak.

While that happened I formulated my plan. 1) See how the whole "dye removal" thing turned out. Early results were poor, but who knows? I could try re-dyeing it. 2) Dye the whole thing yellow now and hope that the resulting color was more pleasant.

I resolved that regardless of which plan I took, I would not do anything for at least two days, as the dye colors do change a bit as the fiber dries out completely. I left the dress in the sunlight and decided to hope for the best.

I quietly cast on for the dress again. I told no one about this.

That was President's Day.

Tuesday, February 9, 2010

Progress

Sunday night during the Super Bowl cut out the revised pattern pieces for the top of the muslin dress.

Going to try and stitch that up tonight.

Last night used the final dye combo to dye the right and left sleeves I'd knitted last week.

Good news! Dye combo yielded the same color that it had the first time! Yay!

Going to reknit these sleeves one last time so I can actually dye them with the skirt portion of the dress.

The rest of this week is a little busy with Justin's birthday and some wedding events for friends of ours.

But I think there's a good chance that next week I will be doing the big dye. Start praying for me (and the dress!) now.

Thursday, February 4, 2010

Sleeves

After much trial and error on the sleeve front, I finally came up with a design I like. This takes advantages of the natural decreases & increases in the pattern and gives the edges a nice, swoopy design. In fact, I like this way of decreasing (which works on both sides of the pattern) much better than what I used on the body of the actual dress. I do not, however, like it so much better that I'll be reknitting the dress. Nope. The decreases already in there work just fine.

So with the sleeves, first I had one that I loved, but was far too big. That's it above. Then I dyed it - it's the green sleeves in the lower middle of the picture below. Then I tried to make a smaller one that just looked terrible. This is it here. Dyed it became the dark green sleeve on the far right. And the shape looked even more horrible than it did during blocking, during which time it was vaguely acceptable. Then it turned crappy. Everything else in this picture are various test color swatches I worked on in the last few weeks.Then I hit on my smart decreasing idea, the sleeve looked great, but was still too small. Then in a moment of brilliance, I came upon the idea of doing the exact same pattern, but going up a needle size. Voila! Perfection. Or at least, near perfection. I'll know for sure when I actually sew up the new bodice.

All this experimentation took place on the left sleeve. Last night I was able to successfully translate the idea to the right sleeve. It's blocking right now.

It's a real statement on what Justin's gone through in terms of being surrounded by knitting (or possibly in terms of time spent around me), that he can see this on the arm of the couch and say nothing. In fact, I've done this numerous times, to no comment. Just so no one worries, I did not leave the sleeve full of pins on the arm of the couch near where he sits.